
프록시 팩토리
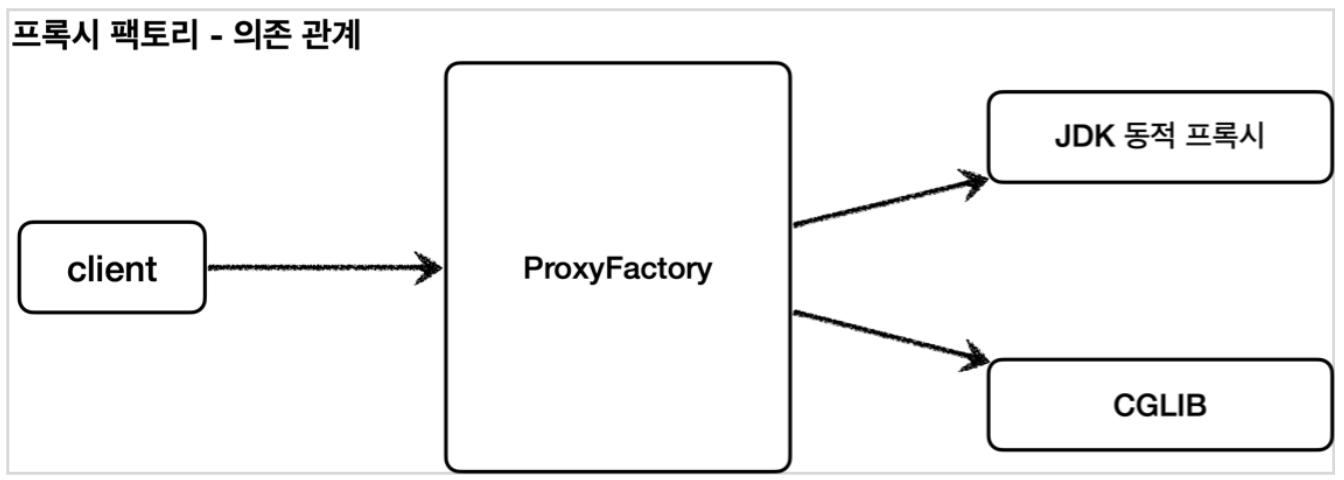
스프링은 동적 프록시를 통합해서 편리하게 만들어주는 프록시 팩토리(ProxyFactory)라는 기능을 제공한다. 과거에는 상황에 따라서 JDK 동적 프록시를 사용하거나 CGIL을 사용해야 했다면, 이제는 프록시 팩토리 하나로 편리하게 동적 프록시를 생성 할 수 있다.
인터페이스, 구체 클래스별 사용 기술
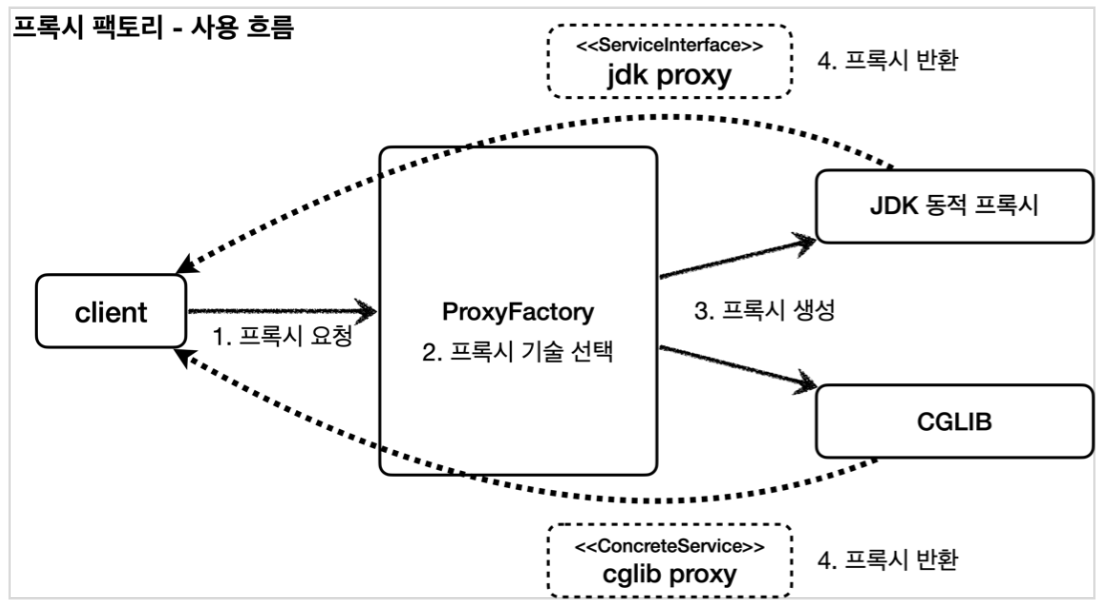
프록시 팩토리는 인터페이스가 있으면 JDK 동적프록시를 사용하고, 구체 클라스만 있다면 CGLIB을 사용한다. 그리고 이 설정또한 변경할 수 있다.
Handler 구현 방식
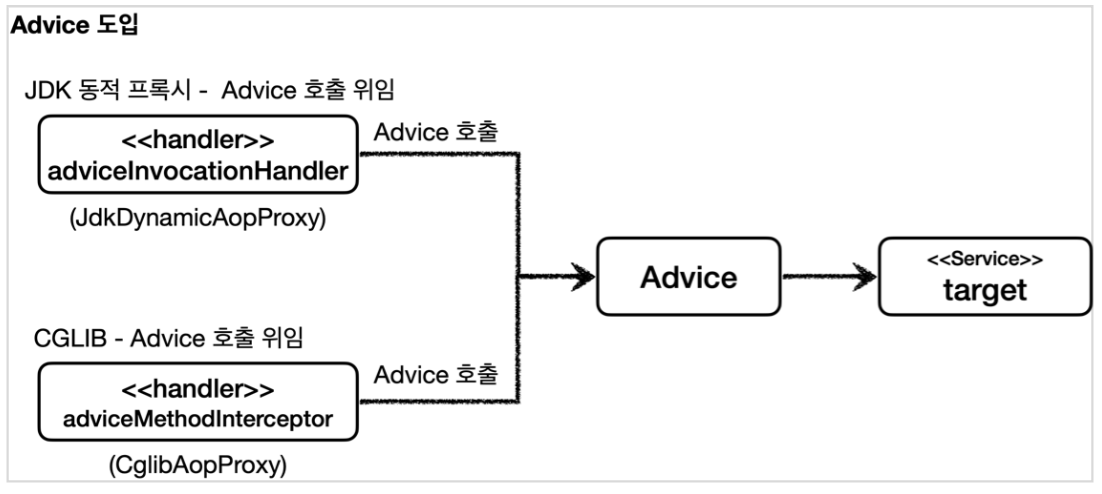
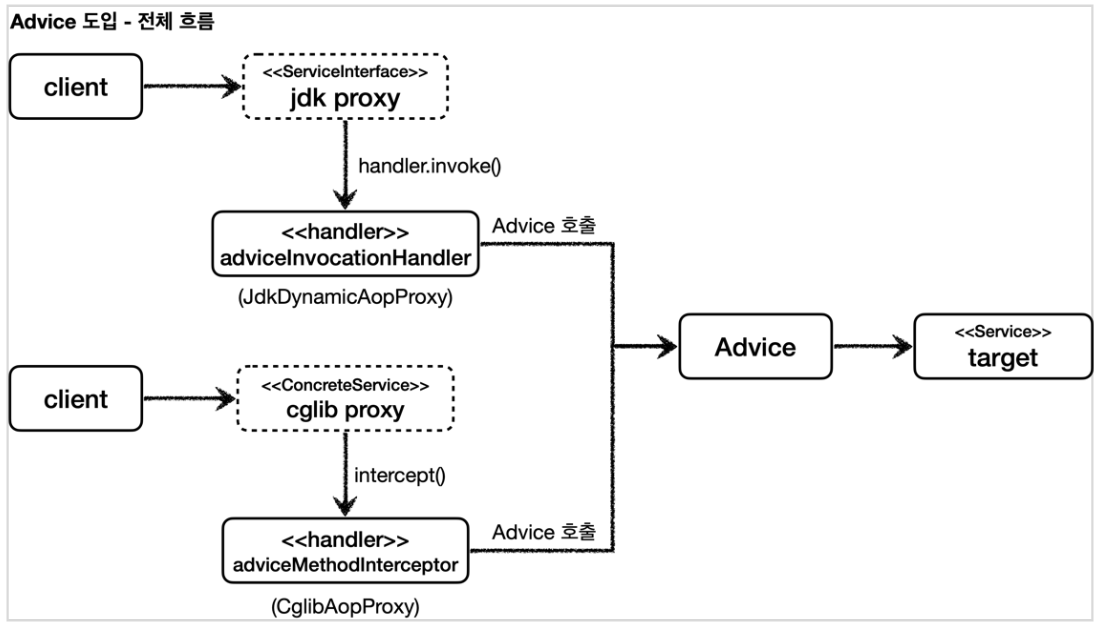
JDK 동적 프록시에는 InvocationHandler 인터페이스를, CGLIB은 MethodInterceptor 인터페이스를 구현하여 프록시의 handler를 구현 하였는데, 프록시 팩토리에서는 Advice라는 개념을 도입하여 이 두개의 인터페이스를 별도로 구현하지 않도록 하였다.
즉, 프록시 팩토리는 내부적으로 Advice를 호출하는 전용 InvocationHandler나 MethodInterceptor를 사용하고 있기 때문에 개발자는 InvocationHandler나 MethodInterceptor를 신경쓰지 않고 Advice만 구현하면 된다.
프록시 팩토리 사용 예시
1
2
3
4
5
6
7
8
9
10
11
12
13
14
15
16

public interface AInterface() {
  void call();
}

public class AImpl() implements AInterface {
  void call() {
    log.info("Interface");
  }
}

public class Concrete {
  void Call() {
    log.info("Concrete");
  }
}
1
2
3
4
5
6
7
8
9
10
11
12
13
14
public class TimeAdvice implements MethodInterceptor {
  @Override
  public Object invoke(MethodInvocation invocation) throws Throwable {
    log.info("TimeProxy 실행");
    long startTime = System.currentTimeMillis();

    Object result = invocation.proceed();

    long endTime = System.currentTimeMillis();
    long resultTime = endTime - startTime;
    log.info("TimeProxy 종료 resultTime={}ms", resultTime);
    return result;
  }
}
1
2
3
4
5
6
7
8
9
10
11
12
13
14
15
16
17
18
19
20
21
22
23
24
25
26
27
28
29
30
31
32
33
34
35
36
37
38
39
40
41
42
43
44
45
46
47
48
@Test
void interfaceProxy() {
  AInterface target = new AImpl();
  ProxyFactory proxyFactory = new ProxyFactory(target);
  proxyFactory.addAdvice(new TimeAdvice());

  AInterface proxy = (AInterface)proxyFactory.getProxy();

  proxy.call();

  Assertions.assertThat(AopUtils.isAopProxy(proxy)).isTrue();
  Assertions.assertThat(AopUtils.isJdkDynamicProxy(proxy)).isTrue();
  Assertions.assertThat(AopUtils.isCglibProxy(proxy)).isFalse();
}

@Test
void concreteProxy() {
  Concrete target = new Concrete();
  ProxyFactory proxyFactory = new ProxyFactory(target);
  proxyFactory.addAdvice(new TimeAdvice());

  Concrete proxy = (Concrete)proxyFactory.getProxy();

  proxy.call();

  Assertions.assertThat(AopUtils.isAopProxy(proxy)).isTrue();
  Assertions.assertThat(AopUtils.isJdkDynamicProxy(proxy)).isFalse();
  Assertions.assertThat(AopUtils.isCglibProxy(proxy)).isTrue();
}

@Test
void proxyTargetClass() {
  AInterface target = new AImpl();
  ProxyFactory proxyFactory = new ProxyFactory(target);

  // interface 가 존재하지만
  // JDK 동적 프록시가 아닌 CGLIB을 사용하도록 옵션 설정
  proxyFactory.setProxyTargetClass(true);
  proxyFactory.addAdvice(new TimeAdvice());

  AInterface proxy = (AInterface)proxyFactory.getProxy();

  proxy.call();

  Assertions.assertThat(AopUtils.isAopProxy(proxy)).isTrue();
  Assertions.assertThat(AopUtils.isJdkDynamicProxy(proxy)).isFalse();
  Assertions.assertThat(AopUtils.isCglibProxy(proxy)).isTrue();
}
스프링 부트는 AOP를 적용할떄 기본적으로 proxyTargetClass=true로 설정해서 사용한다. 그러므로 인터페이스가 있어도 항상 CGLIB을 사용하여 구체 클래스를 기반으로 프록시를 생성한다.
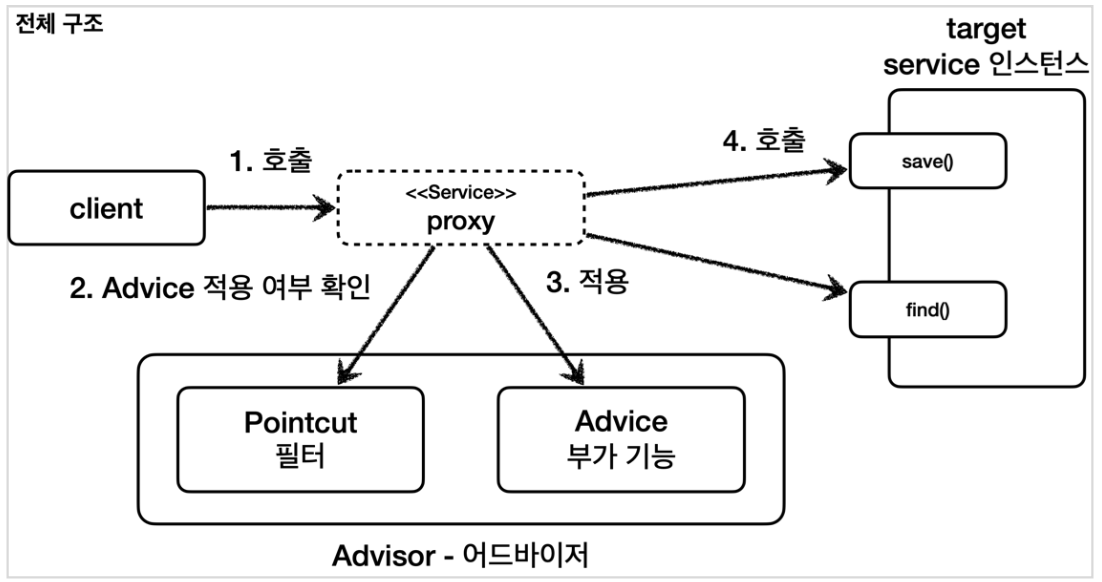
포인트컷, 어드바이스, 어드바이저
- 포인트컷(Pointcut)
- 어디에 부가 기능을 적용할지, 적용하지 않을지 판단하는 필터링 로직
- 주로 클래스와 메소드 이름으로 필터링함
- 어드바이스(Advice)
- 프록시가 홏출하는 부가 기능(프록시 로직)
- 어드바이저(Advisor)
- 하나의 포인트컷과 하나의 어드바이스를 가지고 있는 인스턴스 (포인트컷 1 + 어드바이스 1)
위와 같이 구분한 것은 역할과 책임을 명확하게 분리한 것이다.
- 포인트컷은 대상 여부를 확인하는 필터 역할만 담당
- 어드바이스는 부가 기능 로직만을 담당
- 이 둘을 합쳐 어드바이저를 구성함
어드바이저 사용 코드 예시
1
2
3
4
5
6
7
8
9
10
11
@Test
void advisorTest() {
  AInterface target = new AImpl();
  ProxyFactory proxyFactory = new ProxyFactory(target);
  DefaultPointcutAdvisor advisor = new DefaultPointcutAdvisor(Pointcut.TRUE, new TimeAdvice());
  proxyFactory.addAdvisor(advisor);

  AInterface proxy = (AInterface)proxyFactory.getProxy();

  proxy.call();
}
- Pointcut.TRUE
- 항상 true를 반환하는 포인트컷
- proxyFactory.addAdvisor(advisor)
- 프록시 팩토리에 적용할 어드자이저 지정
- 어드바이저는 내부에 포인트컷과 어드바이스를 모두 가지고 있기 때문에 어디에 어떤 부가기능을 적용해야 할지 어드바이저 하나로 알 수 있음
- 프록시 팩토리를 사용할 떄 어드바이저는 필수
스프링이 제공하는 포인트컷
1
2
3
4
5
6
7
8
9
10
11
12
13
14
15
16
@Test
void adAdvisorTest3() {
  AInterface target = new AImpl();
  ProxyFactory proxyFactory = new ProxyFactory(target);

  NameMatchMethodPointcut pointcut = new NameMatchMethodPointcut();
  pointcut.setMappedName("callx");

  DefaultPointcutAdvisor advisor =
    new DefaultPointcutAdvisor(pointcut, new TimeAdvice());
  proxyFactory.addAdvisor(advisor);

  AInterface proxy = (AInterface)proxyFactory.getProxy();

  proxy.call();
}
위 예시 코드에서의 NameMatchMethodPointcut 뿐만 아니라 다른 여러 포인트컷들도 지원한다.
- NameMatchMethodPointcut
- 메서드 이름을 기반으로 매칭
- 내부에서는 PatternMatchUtils를 사용
- JdkRegexpMethodPointcut
- JDK 정규 표현식을 기반으로 포인트컷을 매칭
- TruePointcut
- 항상 참을 반환
- AnnotationMatchingPointcut
- 애노테이션으로 매칭
- AspectJExpressionPointcut
- aspectJ 표현식으로 매칭
- 실무에서 사용하기 편하고 기능도 가장 많음
- 주로 많이 사용됨
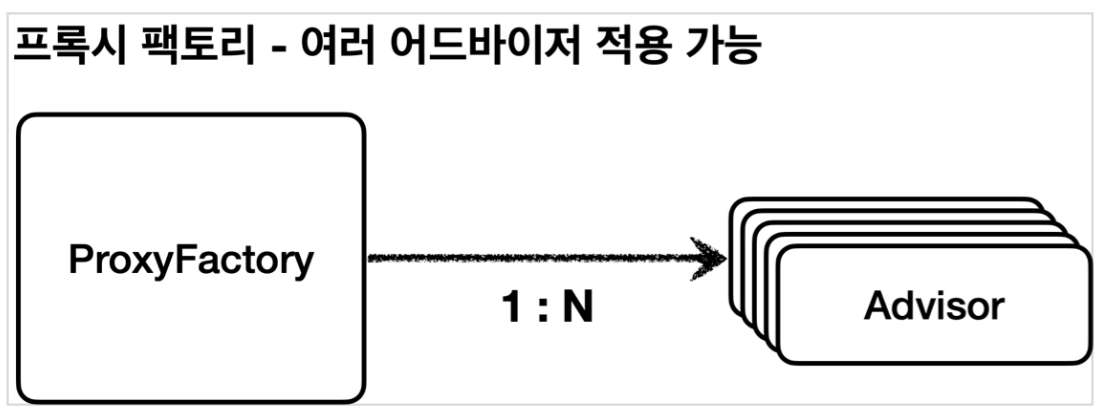
여러 어드바이저 함께 적용
스프링은 하나의 어드바이저당 프록시를 생성하는것이 아닌, 하나의 프록시에 여러 어드바이저를 적용할 수 있게 구현되어 있다.
1
2
3
4
5
6
7
8
9
10
11
12
13
14
15
16
17
@Test
void advisorTest() {
  DefaultPointcutAdvisor advisor1 =
    new DefaultPointcutAdvisor(Pointcut.TRUE, new MyAdvisor1());
  DefaultPointcutAdvisor advisor2 =
    new DefaultPointcutAdvisor(Pointcut.TRUE, new MyAdvisor2());

  AInterface target = new AImpl();
  ProxyFactory proxyFactory = new ProxyFactory(target);

  proxyFactory.addAdvisor(advisor2);
  proxyFactory.addAdvisor(advisor1);

  AInterface proxy = (AInterface)proxyFactory.getProxy();

  proxy.call();
}
- 등록된 어드바이저 순으로 호출됨
- advisor2, advisor1 순으로 등록되었으므로 advisor2 -> advisor1 -> target 순으로 호출됨
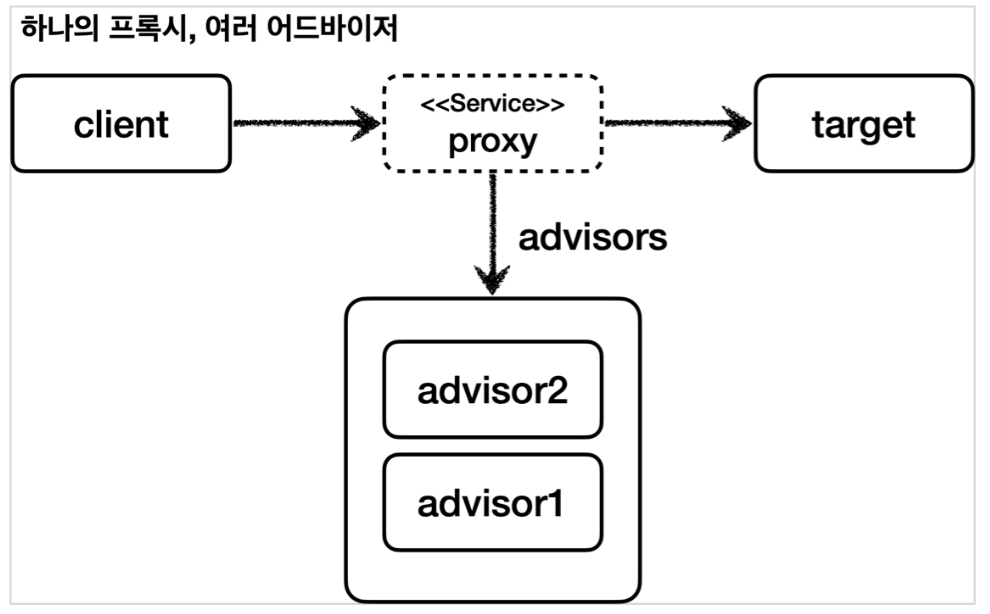
스프링 AOP를 처음 공부하다보면 AOP 적용 수 만큼 프록시가 생성된다고 생각할 수 있다. 그러나 스프링은 AOP를 적용할 때 최적화를 진행하여 프록시는 하나만 만들고, 하나의 프록시에 여러 어드바이저를 적용한다.
즉, 하나의 target 에 여러 AOP가 동시에 적용되더라도, 스프링의 AOP는 target 마다 하나의 프록시만 생성한다.
참고
- 스프링 핵심 원리 - 고급편(김영한)